
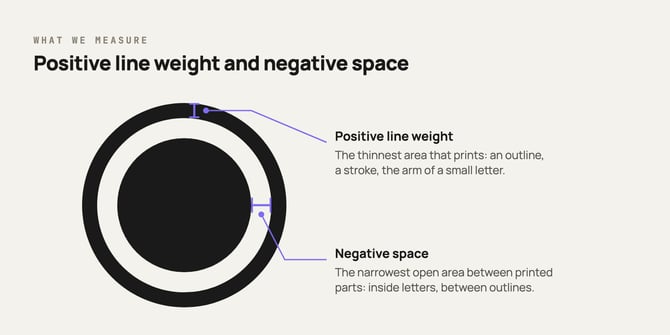
Every transfer formula has a limit on how thin your design's details can be. There are two measurements to check:
- Positive line weight: how thick the printed parts of your design are, like lines, letters, and outlines.
- Negative space: how wide the empty gaps are between printed parts, like the space inside a letter "O" or between two close lines.
Both are measured in points (pt). One point is 1/72 of an inch, so these are very small details. If a line or gap is thinner than the minimum, it may not print cleanly or stick to the garment.
Minimums by formula:
- Screen print: Most need at least 1pt for printed lines and 2pt for gaps.
- Direct to Film, UV DTF stickers, and tagless labels: These can go as small as 0.5pt for printed lines and 1pt for gaps.
- Stretch, Puff, Neon, full color, Luxe, and Blocker: These need thicker lines, and some need wider gaps. Check the tables below for exact numbers.
Both are measured at the size your transfer prints. The same design can meet the minimum on a full front and fall below it on a left chest.
Most screenprinted formulas
| Formula | Positive line weight | Negative space |
|---|---|---|
| Varsity, Classic, Vintage, Silicone, Glow in the Dark | 1pt | 2pt |
| Nylon and Non Woven, spot color | 1pt | 2pt |
Formulas that need thicker lines
| Formula | Positive line weight | Negative space |
|---|---|---|
| Stretch | 2pt | 2pt |
| Puff | 2pt | 4pt |
| Neon | 3pt | 2pt |
| Original Full Color | 3pt on non-white garments | 2pt |
| Full color Nylon and Non Woven | 3pt on non-white garments | Contact support |
| Luxe | 3pt on non-white garments | 1pt |
| Metallic Blocker | 3pt | 3pt |
| Full Color + Blocker, Luxe + Blocker | 5pt | 3pt |
Printing full color or Luxe on white garments? The 3pt minimum does not apply. The white shirt itself acts as the underbase, so no file changes are needed.
If your formula says "Contact support", email support@613originals.com with your file and the formula before you order.
Formulas that can go thinner
| Formula | Positive line weight | Negative space |
|---|---|---|
| Direct to Film, UV DTF stickers | 0.5pt | 1pt |
| Tagless labels | 0.5pt | 1pt |
How to check your file
- Set your art to the exact size you want printed. We print your file at the size you submit, so what you upload is the size you get, regardless of the selected sheet size.
- Find the thinnest line and the smallest gap. Start with small text, fine outlines, the insides of letters, and any distressed texture. That's where most files fall short.
- Compare them to the minimum for your formula. An easy way to do this: draw a test line at the minimum thickness in a bright color that stands out from your design, and set it next to the thinnest part. If your line is thinner than the test line, it needs to be thicker. Do the same for gaps, using a test line at the negative space minimum. Delete your test lines before you upload.
- Check every size you're printing. If the same logo goes on a full front and a left chest, check both. Shrinking a design shrinks its lines and gaps.
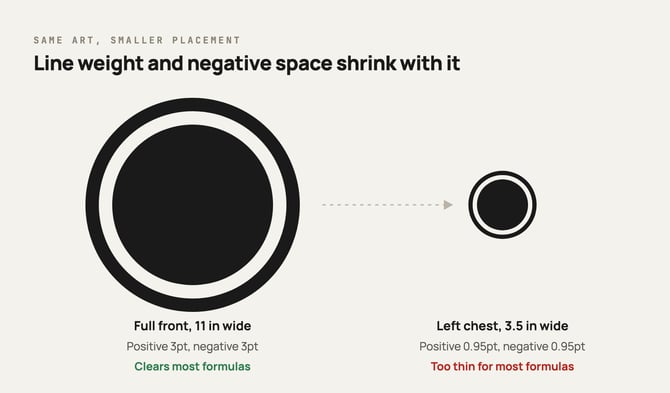
If you resize a Direct to Film design in the gang sheet builder, check it again at the new size.
Before you upload
- Convert text to outlines. Editable fonts can be swapped for a default font when the file is opened, which changes how your design looks. In Illustrator, also convert strokes to shapes.
- Working with a PNG, JPG, or PSD? Set the file to 300 DPI. At 300 DPI, 1pt is about 4 pixels and 2pt is about 8. The full conversion chart is at the bottom of this article.
What happens if your art is below the minimum
If you select Standard Artwork Review at checkout, our Pre-Production team checks your file before it prints, including line weight and negative space. If any line or gap is below the minimum for your formula, your order goes on hold before it moves to production, and support emails you. The email tells you which part of your order is below spec and gives you three options.
Option 1: Revise the file. Adjust your artwork to meet the minimum for your formula, then reply to the email with the corrected file.
Option 2: Add an outline (full color formulas). Our team can add an outline in white, black, or a PMS color around the thin areas to bring them up to the minimum. For full color, we'll ask what color garment the design is going on.
Tip: match the outline to your garment color.
The outline brings thin areas up to the minimum so they print cleanly. If it's the same color as the garment, it blends into the fabric and is hard to notice on the finished product. For example, choose the closest PMS color to your colored shirt. Your design looks the way you intended and still meets the line weight minimum.
Option 3: Proceed as-is. We print the file as submitted, and you accept that areas below the minimum may print inconsistently, fill in, or lose detail.
A few things to know:
- Reply directly to the email thread with your file or your decision.
- We print the revised file at the size submitted.
- Ship dates are based on when we receive a final, print-ready file. The sooner you reply, the better we can hold your turnaround.
More on how artwork review works in what happens if my artwork fails the preflight check.
Why these minimums exist
Some formulas need more room than others, for a specific reason:
- Neon, full color, and Luxe print over a white base layer so the color shows up on dark garments. Lines thinner than 3pt aren't wide enough to hold that white base, so they can print faint, washed out, or not show up at all.
- Blocker formulas use a Blocker ink to stop dye from bleeding through on dark garments. Areas thinner than the minimum may not get Blocker ink, which can let dye seep through and cause color bleeding or distortion.
- Stretch transfers stretch with the garment. Thin lines can crack, fade, or fill in during heat pressing and stretching.
- Puff needs the most negative space. Thin lines and tight gaps can leave spotty puff, missing detail, or ink spreading into areas it shouldn't.
How to fix art that is below the minimum
Pick whichever changes your design the least.
- Thicken the line or widen the gap to the minimum for your formula.
- Print it bigger. A larger placement gives your lines and gaps more room.
- Use a simpler version at small sizes. Drop fine texture or small taglines from pocket and sleeve prints.
- Switch formulas. If your design is mostly fine detail, ask support which formula holds it best.
- Need the art redrawn? 613 Originals prints what you submit and does not create artwork. For vector redraws, contact Art Services at artservices@613originals.com. For new artwork from scratch, work with a graphic designer.
Converting points to inches, millimeters, and pixels
A point is 1/72 of an inch.
| Points | Inches | Millimeters | Pixels at 300 DPI |
|---|---|---|---|
| 0.5pt | 0.007 in | 0.18 mm | about 2 |
| 1pt | 0.014 in | 0.35 mm | about 4 |
| 2pt | 0.028 in | 0.71 mm | about 8 |
| 3pt | 0.042 in | 1.06 mm | about 13 |
| 4pt | 0.056 in | 1.41 mm | about 17 |
| 5pt | 0.069 in | 1.76 mm | about 21 |
Still stuck?
Email support@613originals.com or call (201) 316-1919, Monday to Friday, 8 AM to 6 PM ET.